In the original free version of the MKAL patterns, this stitch was called 1/3 RC. Due to the confusion this caused, it is renamed 1/3 RX in the Ravelry published version.
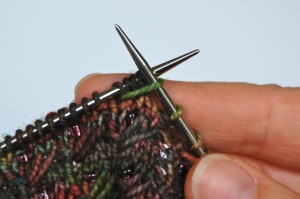
Here is my photo tutorial for the 1/3 Right Crossover used In a Slipstream of Colour.
1. With right side facing and yarn in back, insert right-hand needle into 4th stitch on left-hand needle as if to knit:
2. Wrap yarn around needle to make knit stitch, but leave old stitch on left-hand needle:
 3. Pull the new stitch through to the right side of the work:
 4. Lengthen the new stitch a little so that it sits neatly across your work, in front of the other 3 stitches on the left-hand needle. You could keep it small to make a tighter cable-effect, but in the Slipstream patterns the aim is to show off the yarn colours:
 5. With yarn in back, prepare to knit as normal:
6. Knit the first three stitches on the left-hand needle, dropping the old stitches off the left-hand needle and letting the new stitches sit on the right-hand needle as normal:
7. When you have done this, on the right-hand needle you can see the long stitch followed by 3 regular stitches. The next stitch on the left-hand needle is the one you already worked to make that long stitch; DON’T knit it again!
 8. Simply drop that already-worked stitch off the left-hand needle:
 9. Your 1/3 RX is complete. If you like you can give your new stitches a little pull to tidy them up and that loose loop of old stitch will sit back with its friends. This will happen naturally as you knit; you don’t need to tidy up each set as you go.
 10. If you look on the wrong side of your work, you can see the (green) yarn travel over to knit the 4th stitch, and back again to knit the 1st:
 11. Here’s how a group of these stitches look together. In the row where you have just worked the 1/3 RC (sitting on the right-hand needle now) you will see small holes beside each long stitch. These will close up after a few rows of knitting as the work relaxes. They are unlikely to be obvious on a finished project when the stitches are made this way. The holes may remain if you are pulling the crossed stitch tightly across to make a tighter cable effect.
The beads in this design are added on a later row in the pattern and do not interfere with the 1/3 RX. One thing at a time! If you want help with adding beads, try my introduction to beading tutorial. If you’ve added beads before and want to improve your skills, try the beading tutorial part 2.
Happy knitting! If you still have questions for the Slipstream Mystery Knitalong Clue 2, please ask in the Ravelry Forum threads for the Cowl or Mitts projects.
What do you think? Isn’t it a lovely stitch? Got any questions I haven’t covered?


This is so pretty, and a very clear demo. I am following the issue of this design but haven’t managed to cast it on yet.
Thank you! I’m loving this yarn 🙂
Pingback: 1/1 RX – photo tutorial | INSPIRATION KNITS
What a fun stitch! Thank you so much for such a clear and detailed tutorial. I can see using this stitch in lots of designs.